fabric으로 에러 수집하기
fabric은 트위터가 만든 모바일 어플리케이션을 개발하면서 더 안정적으로 개발할 수 있도록 도와주는 모바일 플랫폼이다.
현재 Crashlytics, Answers, Appsee 등 여러 10개가 넘는 키트가 존재한다. 이번엔 가장 유명하고 쉽게 적용할 수 있는 Crashlytics를 적용해보자.
우선 fabric 사이트 에 들어가 가이드를 따라해보자
build.gradle에 fabric을 추가한다.
build.gradle
buildscript {
  repositories {
    maven { url 'https://maven.fabric.io/public' }
  }

  dependencies {
    // These docs use an open ended version so that our plugin
    // can be updated quickly in response to Android tooling updates

    // We recommend changing it to the latest version from our changelog:
    // https://docs.fabric.io/android/changelog.html#fabric-gradle-plugin
    classpath 'io.fabric.tools:gradle:1.+'
  }
}

apply plugin: 'com.android.application'
// Put Fabric plugin after Android plugin
apply plugin: 'io.fabric'

repositories {
  maven { url 'https://maven.fabric.io/public' }
}
dependencies {
  compile fileTree(dir: 'libs', include: ['*.jar'])
  testCompile 'junit:junit:4.12'
  compile 'com.android.support:appcompat-v7:23.1.1'
  compile 'com.android.support:design:23.1.1'
  compile('com.crashlytics.sdk.android:crashlytics:2.6.7@aar') {
    transitive = true;
  }
fabric 사이트에서 제공하는 API키를 받아와 AndroidManifest.xml에 추가한다.
<?xml version="1.0" encoding="utf-8"?>
<manifest xmlns:android="http://schemas.android.com/apk/res/android">
  <application
      android:allowBackup="true"
      android:icon="@mipmap/ic_launcher"
      android:label="@string/app_name"
      android:theme="@style/AppTheme" >
      <activity android:name=".MainActivity" android:label="@string/app_name" >
        <intent-filter>
          <action android:name="android.intent.action.MAIN" />
          <category android:name="android.intent.category.LAUNCHER" />
        </intent-filter>
      </activity>
      <meta-data
          android:name="io.fabric.ApiKey"
          android:value="API키를 여기 넣으면 되요!"
      />
  </application>
  <uses-permission android:name="android.permission.INTERNET" />
</manifest>
이제 Activity 혹은 Application에서 init해주기만 하면된다. 필자는 서비스나 리시버에서도 죽을 수 있기에 Application 레벨에서 생성해주고있다.
class CalyApplication extends Application {


    @Override
    public void onCreate() {
        Logger.i(TAG, "onCreate");
        super.onCreate();

        init();
    }

    void init(){

        //init fabric
        Fabric.with(this, new Crashlytics());

    }

}
이렇게만 하면 모든 준비가 됬다.(완전 편함!)
강제로 에러를 유도하는 간단한 코드를 만들어 fabric에서 확인해보자
TestActivity
public class TestActivity extends Activity{

    @OnClick(R.id.btn_test_error)
    public void onErrorClick()
    {
        throw new Exception("HelloError");
    }

}
에러가 수집되면 바로 메일로 알려주고, 대시보드에 추가된다.(non fatal에러는 제외)
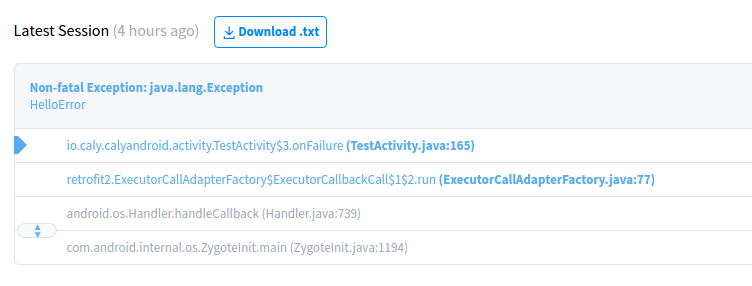
추가로 핸들링을 한 에러들에 대해 직접 로그를 남길수도 있다.
CustomException
class CustomException extends Exception{

    public CustomException(String msg){
        super(msg);
    }

}
Activity
void writeFile(){

    try{
        //File IO
    }
    catch(Exception e){
        Crashlytics.logException(new CustomException("io error"));
    }

}

Comments